


Dual PT2399 Dev Delay Explained
October 24, 2013Nandamonium Unwrapped
November 15, 2013Today we’ll be taking a look at the internal workings of the Synthrotek iPod Audio Interface. This digram details the pinout of Apple’s 4-conductor 1/8″ jack and the corresponding connections on the input and output jacks:
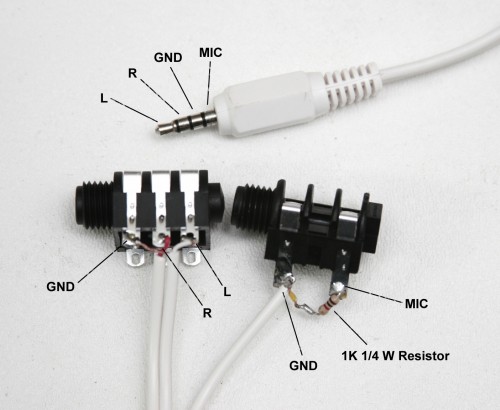
This cable is created using a tri-plug RCA to four conductor 1/8″ cable, a 1/4″ mono jack, a 1/4″ stereo jack, and 1K Ohm 1/4 Watt resistor. Internal insulation colors vary from cable to cable, and it is advisable to check continuity before soldering. To make your own iDevice audio interface cable:
-Remove the RCA connectors from the cable and strip both the external and internal insulation
-Solder a 1/4 Watt 1K Ohm resistor to the tip contact on your mono jack
-Connect the wire with continuity to the MIC contact to the other end of the resistor, and solder the corresponding ground the sleeve contact on your mono jack
-Twist the ground (exterior) connections of your remaining two wires together and solder to the sleeve contact on your stereo jack
-Solder the wire with continuity to the right channel contact to the ring connector of your stereo jack
-Solder the wire with continuity to the left channel contact to the tip connector of your stereo jack
Now you are ready for testing – connect your guitar or microphone to the mono jack, connect your cable to your iDevice, connect your stereo jack to amplifier/speakers/headphones, and test with Amplitube or an equivalent app.