


Important Links
Product Page
Store Page
Assembly Instructions
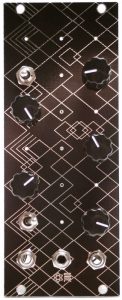
Eurorack Mod
Bill of Materials
Schematic
Capacitor and Resistor Lookup Guide
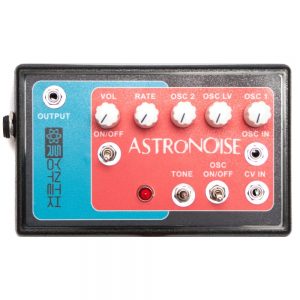
The AstroNoise is a massive vintage video game-inspired noise-making machine! Shape the galactic frequencies with 4 onboard controls. The “Oscillator Rate” controls the master frequency. The two LFOs and the LFO pitch modulate that frequency and together allow you to make rhythms, video game motorcycle sounds and more.
The AstroNoise whets your appetite further by letting you choose between 3 different radical vintage tones. The adventurous user can use it to make beats, lead lines and noise swashes by connecting other devices into the LFO input and the Control Voltage input (optional). The fun doesn’t end after building the circuit! Take your creative skills further by designing your own custom enclosure out of an old cigar box, lunch box, doll head, etc!
In the past it has just been a standalone circuit, but the lofi wizards of Synthrotek have modded the board for Eurorack. If you’ve already built the AstroNoise in the past, you can still convert it. The kit doesn’t come with all the parts needed for the Eurorack version, but you can view the extra parts needed and check out the mod here.
Features:
- Tone Select Switch lets you choose between three classic sounds: bleeps and bloops, 8bit explosions and razor-edge squares
- Oscillator Rate Control (“Rate” on the PCB) changes the master frequency and rate
- LFO Rate 1 Control (OSC1)
- LFO Rate 2 Control (OSC2)
- LFO Pitch Control (OSC_LVL)
- Volume Control
- Oscillator On/Off switch (turns off LFO Rate 1/OSC1 and LFO Pitch/OSC_LVL)
- LFO Input (OSC_IN): use for external control of LFO Rate 1 with an input of 1-150 Hz
- Control Voltage (CV) input (disables LFOs)
- Power on/off switch
- 9V DC jack (requires center negative) and battery clip
Synthrotek,
I recieved my Atari Junk in an awesome amount of time. I completely installed all of the parts without any problems at all. Also the the fix with the pcb was right on the money and easy to do. This was my first DIY kit and I really enjoyed every bit of it. The only complaint I have is that I had to go out and buy 2 spst toggle swithes because you sent me 2 spdt switches and that was it far as switches go i had all of the other parts in my kit. I bought the pre-drilled project box for $12.99 but it was the wrong one so I will be sending that back I had an aluminum tin can that I put it in and I put your sticker on the top of that can. Im trying to make my mind up on which DIY project to do next that will go along with the Atari Junk. I’ve played with the thing for hours plus I showed it off at school in my electronics class here in Maryland I have a few days left out of a 10 month course. Thanks for the stand up project and instructions…..
Thanks Scott, yeah we will totally exchange that box, no issue and get you some switches, sorry for the hassle. Email us up, and it will be taken care of asap!
A couple of day ago I’ve finished assembly the atari junk synth, I found out I was missing two components
a 0.1uF Ceramic Capacitor and the SPDT (Center Off) Toggle Switch. I couldn’t wait to hear it
so a went to my local electronics parts store and got both parts, unfortunately the synth starts but doesn’t
make any sound/noise the capacitor that I’ve got is a 0.1uF 50V, I’ve placed on C6.
Could you please let me know if this a critical factor for the synth not working.
If not is there some kind of troubleshoot that I can measure to see if I haven’t done something
wrong…
Thanks and best regards.
Sorry to hear there were missing parts.
The two big things to check would be to first ensure that the traces were cut correctly, that the jumper wires are good, and that no components are making contact with the jumper wires in a manner that they should not.
Also, did you apply jumpers to the Mod A and Mod B sections of the PCB? The 2nd to last photo in the assembly instructions details how to jumper the Mod grids.
One more thing that might be a factor, the 0.1uF capacitor you got and installed into C6, was that a polar sensitive capacitor like an electrolytic capacitor? If so, installing it backwards will cause issues and we do not have the markings on C6 for polar capacitors.
—
Synthrotek
Hello, I’m planning to get the Atari Junk kit and was wondering which plastic enclosure would fit it? None of them lists the Junk Console as a kit that would fit into them. Thanks a lot, looking forward to building it!
Hello,
I know its not listed on this one, but you can totally fit the Atari Junk into this case here, 1590KTS Black Sloping Case
Best,
-Patrick
Hello Steve, where is the photo in the assembly instructions that details how to jumper the Mod grids?? Doesn’t seem to be on the Assembly Instructions page. Just built my AJC and loving it, and would really like to play around with the mods. Thanks!
I think I have a problem with my AJC kit. When I power it on it has to be set to the middle tone or else it’s remains silent for about 10 seconds or so. Also, the tone 1 and tone 3 sound different every time I switch to them. This can be right, can it? Any ideas?
Hello,
Yeah, it definitely shouldn’t be like that. I would check out our Troubleshooting Guide, and check component placement, it sounds like maybe a cap got switched up, or a resistor maybe.
Best,
-Patrick
Hey there,
R13 on the DLY module is input impedance, and is not necessary for the DLY to function
Best,
-Patrick